projects
Showing posts with label projects. Show all posts

Come Join My New Adventure {Oh My Craft Supply Group}

Tuesday, February 23, 2021

1 comment

Hello all! If you've been hanging around here from the beginning then you know that besides making jewelry there are many other things I like to do/make. Crafting is a BIG one! From "garden junk" and DIY to smaller crafts and printables, I love it all!


This love of crafting has inspired me to embark on a new adventure! I've started a new Facebook crafting group called Oh My Craft Supply Group. Along with this group is a FB page and very soon an Etsy craft supply shop! 


My hope is that all of you crafty peeps that love crafting like I do, will come and join this group. The goal is to grow this group with members that genuinely want to be there. Members that love to share their crafts and love to help and inspire other crafters too! If that's you please join the group.


Read More

Wine Cork Shadow Box

Monday, April 8, 2019

1 comment

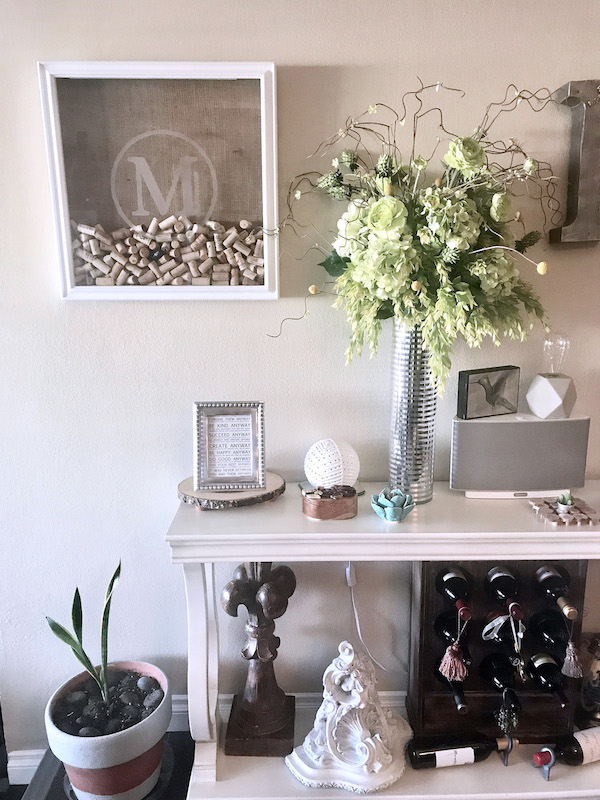
You see the wine cork shadow box on the left? This beautiful piece was created from a thrift store picture frame. It was a gift for my sis in law. She sent me this picture to use so you can see how it's sitting pretty in her lovely home!

Below is the picture I picked up at the thrift store. You can use many sizes of frames for this project just pick the size you like or what fits your needs.

You need some basic wood cutting and nailing skills or at least be able to figure that out. Basically, all you do is build a box the size of your frame with 1x2 boards. 

Glue burlap or whatever backing you like to a flat backer board. And sandwich them all together. I nailed them all together so there's no getting it apart and no getting the corks out.

The trickiest part is getting the glass to stay in place. I'm sure you can glue it or caulk it and that might be easier and actually look better. In fact, if I make another I might try that. On this one, I glued very thin trim pieces to hold the glass. You can kind of see one in the photo below.  

Before putting all together and before painting, drill a hole large enough to fit a cork, in the center of the board that will be on top.

Corks drop right through the hole and land where they will! I dropped just a few to make sure it worked.

For the glass decoration, you can do a pretty vinyl piece and that's it. I know tons of you have handy vinyl cutters! I had my friend make the circle and the M (last name initial) on her Cricut and I used the negative space from it (you know that parts that you usually weed out and toss) to etch the glass with a product from the craft store called Armour Etch.

This project turned out great and I was very happy with the outcome.

You really can make these to hold any small objects. Legos or small toys would look neat inside! Or seashells would be pretty! What would you put inside?


Read More

Giant Sand Dollar (DIY)

Wednesday, February 20, 2019

9 comments
I first saw this over at Thrifty and Chic many years ago and knew I wanted to make one and I had just the piece! We've been holding on to this table top for a long time, my husband actually made it in high school woodshop! Whoa, that's old lol!!!


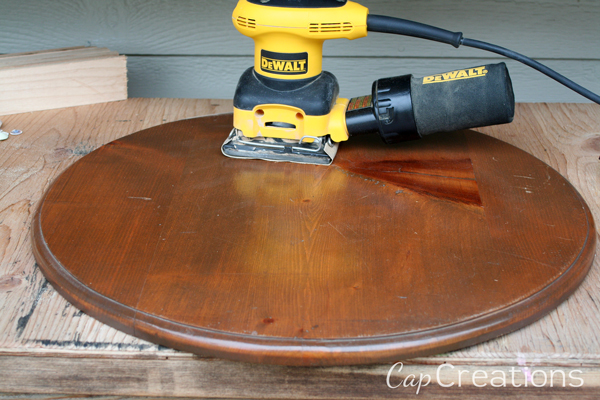
I thought I would be able to do this with just a small hand sander but decided to use our scroll saw to make some cuts to the edges and get our overall shape and remove some of the bulk. The photo below is after my husband had done plenty of sanding for me.


Sorry I don't have any painting photos but here's what it looked like right before painting.


I simply painted it white and let dry. I then lightly free handed in pencil first and then used a tan color for the sand dollar details.


I also gave it a quick sanding to make it look a bit rustic and worn. These last two photos are my new sand dollar in my bathroom. The lighting isn't the greatest as that room has no windows but I love how my giant sand dollar came out!


Read More

Kitchen Table Before and After

Saturday, October 24, 2015

No comments
Hi all! I am so excited to share my beautiful and new to me kitchen table! When I spotted this table at the thrift store she wasn't too pretty but I knew she had it in her to be a thing of beauty. She had good bones, her flaws were cosmetic not structural. She stood tall and she stood proud and for only 12 bucks it was worth a try! Yep that's right $12! And it was just the perfect size for my kitchen booth! What more could a girl ask for?


You know how it is when you've been on the hunt and FINALLY, it arrives? Yeah that was me with this table. I was all over it like white on rice!  I wanted that straight edge top, not those decorative, beveled edges and boy it was hard to find. I also did NOT want the claw feet but I settled.

Here's how she looked at first glance.

The first thing I did was get out my handy dandy palm sander and I went to work. I sanded every part I could get to with my sander. Then by hand in the little nooks and crannies. Once I got off  the funky painted mess on top I could see some really cool wood grain going on. Sad thing was it was a veneer so I had to tread lightly.

Top before sanding with some kind of funky paint job going on.

Top after sanding. LOOK at that lovely wood grain!

For the top I sanded with 2 grits of sandpaper. I then stained the top. I wanted it dark however (I think due to the veneer) it would only take one coat of wood stain. After staining I put on 3 coats of polyurethane. This is our everyday meal/homework table so I wanted a good seal on it.


For the base I sanded with 2 grits of sandpaper. My husband then did the primer and the painting for me. Lucky girl huh? After the paint dried I sanded again with my palm sander to knock off some paint and give it that worn, shabby country feel. To antique I then went over the entire panted area with wood stain and wiped off the excess. Let it dry and it was good to go!

I absolutely LOVE how it came out and I LOVE how it looks in my kitchen! Every time I walk by it catches my attention and I can't take my eyes off of it! It is not perfect in any way but the "flaws" and imperfections are what I love the most!


So when you see that beat up looking piece that catches your eye give it a chance. You never know if you never try! You just may end up loving it!
Read More

Thrift Store Desk Before & After

Monday, June 1, 2015

6 comments
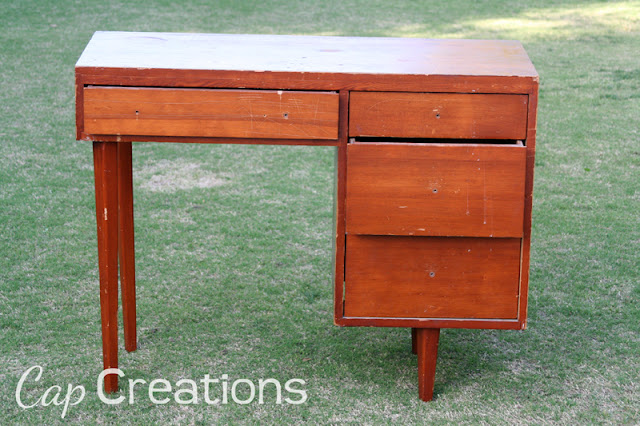
I found this adorable little desk at the thrift store one day. It just so happened to be sale day so I picked it up for under $12! Yay me!!! I had been looking for a desk for quite some time so I knew it was a steal. It was a bit rough but with good structure.


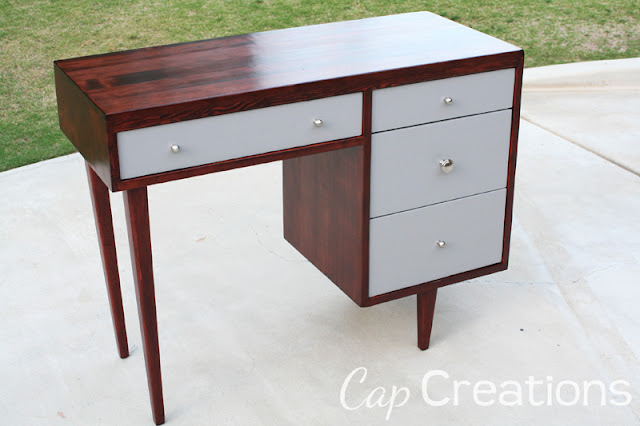
I stained with Minwax, Red Mahogany and painted the drawers with Valspar Cathedral Stone. The knobs came with it except for one. The gunk and gold tone came right off the knobs with a green scrubbie pad! They now have a brushed silver tone.  Does it look horribly bad with that one middle one different? This desk is for my kiddo and I don't think he cares.


So what cha think?

  Are you working on any projects for the summer?
Read More

A Summer Project

Tuesday, July 3, 2012

5 comments
Update: Super excited to share that this project was featured in Country Sampler Special Gardens Issue!!!
I wanted to share this wheelbarrow water fountain that my husband took upon himself to build. I did NOT ask him to do this! It was something he saw one day while he was out working. He took a picture and decided to build it! I love when he does things to beautify without me asking.


Water pours out of the wheelbarrow and looks like it's spilling out, onto the ground. It sounds great! Love it!


Geez look at all that junk in the background!


If you've been around for any of my Thrifty Love link parties, (by the way there is one going on now) you know I like old junk. lol! In the yard we call it garden junk, and most of what you see in the background still needs to be made into it's "purpose" lol! LOTS of ideas, just not enough time!

So what type of summer projects do you have going on around your home?
Read More

Past Halloween Ideas

Monday, October 17, 2011

No comments
Just taking a moment to share some of our past Halloween ideas! Click on the pictures to be taken to each post.
Dollar store Halloween decor. This one will set you back $4.

Adorable Halloween and fall soap favors with free printable tags.


And this little thrift store guy wanted to say hi! lol!

Hope these inspire you just a bit! And don't forget to snag our free 5x7 Halloween print HERE. Print and frame and you're good to go!

Have a great week folks!
Read More

Pretty Yard Space

Monday, October 10, 2011

4 comments
I love pretty spaces in the yard. One area we FINALLY finished is pretty much a focal point in our backyard. The triangular shape of our yard leads your eye right to this point. This area holds our deep pit and if you've seen one you know it's not much to look at. They are handy to have but they are not pretty. I wanted to hide it!

Wish I had a before picture but I only got a during and after. Picture if you will, a deep pit, dirt with the wood fence behind it, all retained by railroad ties. The railroad ties were pretty cool but having small children they were a health concern due to the chemicals used to treat them. So we tore those bad boys out and replaced them with retaining wall bricks. These are so easy cause they literally just stack.

So here's our during picture. So far what we've done here is add the new 2 foot retaining wall, a fountain and a section of rod iron fencing to hide the deep pit. We planted jasmine on the rod iron and it filled in beautifully! Deep pit hidden! Now this area actually sat this way for a couple of years. 1 year for the rod iron fencing one year for the fountain and finally...

...the after and I LOVE it!!!

We added stepping stone pavers and gravel around the fountain. Due to water splashing from the fountain that area was constantly wet and muddy! We packed the gravel a few inches deep so the water now sits below the gravel and the muddy water problem is solved! We added two potted plants that we already had at each end of the jasmine wall.

Next we planted the ground cover from seed which you can see starting to grow over here. This ground cover is awesome! It's called dichondra and here is what I love about it. It grows fast, handles full sun, it's hardy (you can walk all over this stuff), drought tolerant, can take the heat and it's BEAUTIFUL! Just look at that bright shade of green but pay no attention to that weed!
Isn't this a lovely space?
 It's nice to look at, has a lovely sound from the fountain, and it's doing a fantastic job hiding that deep pit!
We need to restain that wood fence and I still want to add a sitting area here but that's another story. I have the perfect iron table and 2 chairs that I need to refinish. Another project for another day though!
So this is one lovely space in a yard that I love that my husband works so hard at maintaining. Thank you sweetie! You do a terrific job!

Linking to:
Funky Junk Interiors
Read More

DIY Canvas Print With Free Printable

Monday, August 15, 2011

4 comments
Love the look of canvas prints but not the price? Yeah, you can get a good deal on a canvas print sometimes but usually, they are pretty pricey. You can create a canvas look for a fraction of the cost. And it's very easy. Here's how I did it!

Supplies:
• 8x10 Canvas (craft store, Walmart, big lots has them too)  You can pick these up for $2 or less!
• 8x10 Photo/Print printed at a photo lab. (Costco is the best!)
• Paint Brush
• Paint to match your print.
• Mod Podge
• Scissors or Paper Cutter

Let's get started, shall we? If you'd like to use our print you can get it HERE. Don't have a photo of this step but trim your 8x10 print to fit your canvas. It's not much, just enough so your photo will not hang over the edges of your canvas.

Paint around the entire edge/sides of your canvas. Go ahead and cover just a tiny bit of the top edges too. I give mine 2 coats for good coverage. Let dry.

Once the paint has dried add a layer of Mod Podge to the entire surface of the canvas and stick on the 8x10 print/photo. Basically, you're gluing it on.

It should now look like this.

Next, cover the entire photo with Mod Podge. Also, be sure to cover the sides that were painted earlier. (Try not to be jealous of my lovely manicure hehe!)

Here's a close up for some detail. You will see the brush strokes when it dries. I personally like them, makes it look like maybe the canvas really is painted. But if that's not your thing smooth them out as much as possible. Let dry and use your best judgment as to whether or not you need a second coat of Mod Podge.

Let dry and display as you please. Looks great on an end table or hang on a wall.

For our who can I bless canvas, I think somewhere you'll see each day when you leave home is perfect. Like a simple last-minute reminder as you're stepping out the door!

What do you think? Easy right? Don't forget you can snag our who can I bless today print HERE. This printable was created with products from Michelle Underwood Designs.

If you have any 8x10 printables you'd like to share with us please leave the link to it in the comments! Thanks for reading. Let me know if you have any questions.
Read More

Part 2 of the Cheese Dome

Wednesday, July 27, 2011

20 comments
Remember the cheese dome and how I used the bottom part to create this over sized button?


Well lets take a look at what I did with the top of that cheese dome. Couldn't have that top part going to waste! Here's what I started with.

To the glass cover I added this chunky wooden candle stick. First I made the candle hole larger. Large enough for the handle of the dome to fit into. I painted the candle stick and antiqued it. Lastly I glued (E6000) the cheese dome upside down to the candle stick.

And Walla! A lovely pedestal bowl!

Totally love how this one came out! And love my little thrift store balls in there! All parts for this piece were picked up at the thrift store! Yeah way to up-cycle! Go me! lol!

Just a shot of the inside, glued part.

And from another angle just in case you need details!

Ahhhh! So pretty! Do you want one?
What have you created lately?

Linking to:
Southern Hospitality

S- The DIY Showoff, Under the Table and Dreaming, MThe Girl Creative, MM Party at BNOTP, Making the World Cuter, Skip to my Lou, Sumo's Sweet Stuff, Keeping it SimpleT- Coastal Charm, Tip Junkie, All Thingz Related, Today's Creative Blog, Hope Studios W- Trendy Treehouse, Blue Cricket Design, Someday Crafts, My Backyard Eden, Room to Inspire, Creations by Kara, Just a Girl, T- Yesterday on Tuesday, The Shabby Chic Cottage, Somewhat Simple, Beyond the Picket Fence, Tidy Mom, Fireflies and JellybeansF- A Few of My Favorite Things, It's FUN to Craft, The Shabby Nest, Fingerprints on the Fridge, Tatertots and Jello, Funky Junk InteriorsS- Along for the Ride, I Heart Naptime
Read More