
I picked up this cheese dome at a thrift shop. Cause life is just not complete without a trip to the thrift shop! Ya know what I mean?
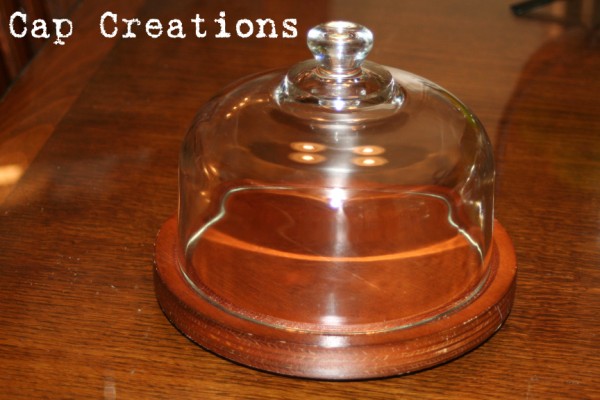
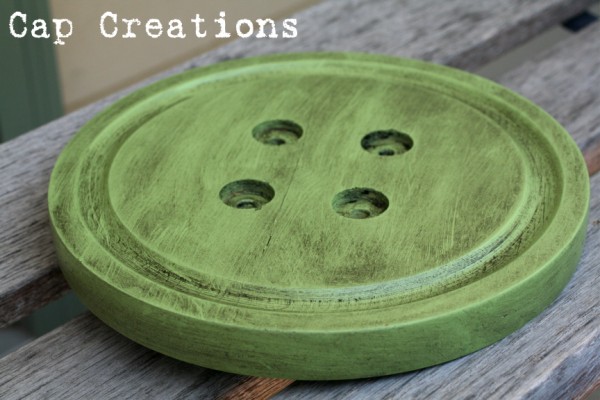
I removed the dome and the small rubber feet off the bottom, which were held on with 3 tiny screws. I then marked 4 spots on the front center area for holes. My husband helped me with this next part BUT it was very simple and you could do it yourself. He was offering to help so why not? Using a circle drill bit drill 4 small holes like a button. Then paint!
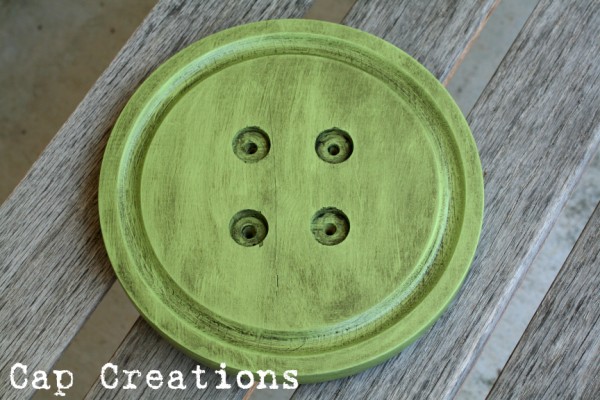
How cute! I added some antiquing and a small sawtooth hanger to the backside. It's the perfect little wall decor for any craft or sewing room! Also looks adorable on a small easel. I am temped to add some x shape string (shoestring, rope ???) to the holes to look like thread! Yeah, no, what do you think?
Have you entered our current giveaway? Click HERE to enter now!
Linking to:
Southern Hospitality
S- The DIY Showoff, Under the Table and Dreaming, M - The Girl Creative, MM Party at BNOTP, Making the World Cuter, Skip to my Lou, Sumo's Sweet Stuff, Keeping it Simple, T- Coastal Charm, Tip Junkie, All Thingz Related, Today's Creative Blog, Hope Studios W- Trendy Treehouse, Blue Cricket Design, Me and My Bucket, Someday Crafts, My Backyard Eden, Room to Inspire, Creations by Kara, Just a Girl, T- Yesterday on Tuesday, The Shabby Chic Cottage, Life as Lori, Somewhat Simple, Beyond the Picket Fence, Tidy Mom, Fireflies and Jellybeans, F- A Few of My Favorite Things, It's FUN to Craft, The Shabby Nest, Fingerprints on the Fridge, Tatertots and Jello, Funky Junk Interiors, S- Along for the Ride, I Heart Naptime
That's an extremely cute idea! Why don't you try one hole with string and see how you like it, then you can decide which way to go. And yes, I love me some thrift store - meet you there ;)
ReplyDeletewhat a terrific idea, I love buttons so that would be so great in my sewing area:)
ReplyDeleteThis could not be cuter! I absolutely love it. It makes me feel like I'm in Pixie Hollow! Thanks for sharing!
ReplyDeleteGah! Too darling for words! I'd like a little more detail on your holes. I think I can do this myself--a wood drill bit first? One (or more) of these is In. My. Future! I'm going to check out your giveaway, I'm having one, too, take a look here: http://cheapchichome.blogspot.com/2011/07/chocolate-espresso-bean-giveaway.html Hugs, Kim
ReplyDeleteCute idea...love it
ReplyDeleteJust a quick note to let you know that a link to this post will be placed on CraftCrave today [12 Jul 01:00am GMT]. Thanks, Maria
ReplyDeleteCat can you please email me... I need to ask you a Q...mel_cordell@hotmail.com
ReplyDeleteThis is just to cool. I love it.
ReplyDeleteThat is such a cute idea, I love the color you chose as well.
ReplyDeleteThanks so much for stopping by and your great comment. I hope you will stop by again soon.
:) Michelle
Thanks for your comments ladies! This would be great in a laundry room too!
ReplyDelete@ Mary See ya there for sure!
@ Tanya lol Pixie Hollow! love it!
@ Kim great! I'd love to see yours when your done!
@ Mel emailing.
Love the button! Very,very creative!
ReplyDeleteThanks for stopping by Flora Doora!
Jane
Flora Doora
This is another one of those crafts that is simple yet simply BRILLIANT!
ReplyDeleteSo I do not forget where I found it I am bookmarking it as well as saving it to my crafts link folder. You know I will never again see a cloche bottom and NOT think huge button. Really do love this.
If you saw my desk with Thumb Tack lamps and giant pencils you could appreciate how much I love this.
Right now my post is about trying to re-find another craft post I saw, loved, and can not find again!
How clever to use a cheese dome! I've seen wall art like this before, but it's from wooden chargers or pricey table tops. Love your thrift store refashion!
ReplyDeleteWhat a creative idea! I could imagine a grouping of different size "buttons" hung on the wall. So cute.
ReplyDeleteDanielle
This is so clever!!! I LOVE IT!!!!
ReplyDeletewww.iheartmygluegun.com
I love buttons, this is cute. I would love for you to link this up to My Favorite Things party! There's a new one every Friday
ReplyDelete& be sure to check out my giveaway too! Stopping by from the Tip Me Tuesday party.
Thanks
~Iffy~
www.stayathomenation.blogspot.com
I love it! (But then again I am a teensy bit obsessed with buttons!!)
ReplyDeletewww.sewrayme.co.uk
CRAP can you see my crying! CRYING. I went back and fourth with myself over tossing this out...I bought it for the dome, and after I finally threw this away no more than a wee ago, I see this one. I am so mad at myself. Love the tuto and I will soon be on the lookout for another cheesedome!!! GREAT idea!
ReplyDeleteHow impressive that you saw that button in the cheese dome base! It is adorable!
ReplyDeleteCute!
ReplyDeleteThanks again for all the comments!
ReplyDelete@sweet sugar belle - Awe so sorry you got rid of it, you'll find a new one soon!
@Shirley- actually did see this somewhere before but I have no idea where.
I'm hoping maybe mom has one I can steal, I mean borrow LOL. Kidding...Pinned this. It's PRETTY!
ReplyDeleteI love how this turned out. Great sewing room decor :)
ReplyDeleteI've had buttons on the brain lately, so when I saw your link-up at Yesterday on Tuesday I just had to come by. Brilliant! What a creative and wonderful upcycle! Definitely going up on my Pinterest board!
ReplyDeleteNew follower,
Jenn/Rook No. 17
I'm so making this for my craft studio! This will be perfect! Thanks for sharing!
ReplyDeleteI'm following you now. Stop by My Pretties and see what I've been up to if you'd like!
www.illgetyoumypretties.blogspot.com
I definitely think you should add the x shape string... maybe use hemp or jute? This is darling! Thanks for sharing!
ReplyDeleteWhat a fun project, and I have some of these wood cheese platters! Thanks for linking up to Beyond the Picket Fence.
ReplyDeleteLove this! Thanks so much for linking it up. I'll be featuring it tomorrow. :)
ReplyDelete